Three Delicious Back To School Lunches
August 03, 2018Summer is a great time to relax and bond with your family in your outdoor living space, but it’s also the perfect time to start prepping for the school year. Why not do both? Try out these back to school lunch recipes in your outdoor kitchen with your kids and find out which ones get a thumbs up and stamp of approval for future school lunches!

Mac and Cheese Muffins
What you'll need:
• Prepared macaroni and cheese
• 1 egg
• Butter
• Muffin tin
1. Take prepared mac and cheese and add one egg yolk, and mix it together.
2. Grease a 12-cup muffin tin, scoop and fill each cup with the mac 'n cheese.
3. Bake the cups at 400°F for 10-15 minutes, until the edges brown.
4. These bites keep well in the freezer, so prepare a big batch and store them in the freezer. Then simply thaw in fridge and reheat in the morning.
Photo and recipe courtesy: https://ziploc.com/en/recipes/tips-and-tricks/simple-lunch-tweaks-for-kids-and-grownups?cid=social_Pinterest_promoted-MacNcheeseBites-121316_ZiplocJFM17

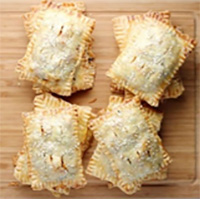
Taco Pop Tarts
What you'll need:
• 2 boxes refrigerated pie crusts (total of 4 pie crusts), at room temperature
• 1 tablespoon olive oil
• 1/2 onion, thinly sliced
• 1/2 pound ground beef
• 1 tablespoon taco seasoning
• 1 cup frozen corn, thawed
• 1 cup canned black beans, drained
• 1 cup shredded cheddar
• 1 egg, beaten with 1 tablespoon water
• Sesame seeds for sprinkling
1. Preheat oven to 350° F and line two baking sheets with parchment paper.
2. Working with one crust at a time, unroll onto your work surface and cut into six 3" x 4" rectangles. Repeat with the remaining crusts; cover with a towel to keep from drying out.
3. In a large skillet over medium-high heat, heat the olive oil until hot but not smoking. Saute the onion for 5 minutes. Add the beef and cook, breaking it up with a wooden spoon, until completely cooked through (no pink remaining). Add the taco seasoning and stir to combine. Add the corn and beans and cook for 2-3 minutes more. Remove from heat and let cool until warm.
4. Place six pie crust rectangles on one of your prepared baking sheets.
5. Top with a spoonful of the beef filling, followed by a handful of shredded cheese.
6. Top with six more crusts and gently press around the edges. Use a fork to crimp and seal; make a few small incisions in the top to allow steam to escape. Brush with some of the beaten egg and sprinkle with sesame seeds. Repeat with remaining crusts and fillings
7. Bake for 15-20 minutes, or until golden brown. Serve immediately or let cool and freeze for longer storage.
Photo and recipe courtesy: https://www.babble.com/best-recipes/taco-pop-tarts/?cmp=SMC%7Cnone%7Cnatural%7CBabble%7CBabbleMay%7CPIN%7Ctacopoptarts-Babble%7CInHouse%7C2016-05-11%7C%7C%7Cesocialmedia

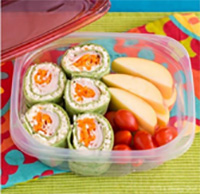
Turkey and cheese Sushi Sandwich
You'll need:
• 1 spinach tortilla or sandwich wrap
• 1 teaspoon cream cheese
• 1/2 cup shredded mozzarella cheese
• 4 slices Hillshire Farm® Turkey Breast Lunch Meat
• 1/4 cup shredded carrots
• 1/4 cup Ranch dressing, optional
1. Cut edges of tortilla to make more of a square shape than a circle. Spread cream cheese along the far edge. It just needs to cover about 1/2" strip of tortilla.
2. Spread mozzarella evenly overly tortilla, starting where the cream cheese ends and leaving about a two-inch strip on the end closest to you uncovered.
3. Arrange turkey slices on that uncovered strip closest to you, and arrange carrots on top of the turkey.
4. Now it's time to roll! The key is to roll it very tight. Fold over the end with the turkey, and roll it tightly, squeezing it toward you as you fold/roll. Continue rolling and squeezing the tortilla, finishing by pressing the rolled sandwich down so the cream cheese "glues" it closed.
5. Next, use a sharp knife to cut your roll into 1/2" pieces as shown. Serve with ranch dressing for dipping if desired.
Photo and recipe courtesy: https://wearychef.com/sushi-sandwich-turkey/
