Outdoor Arts and Crafts
September 02, 2018Fall is the perfect season to spend time outside with your kids. If you're looking for creative activities to keep your little ones busy after school, check out these outdoor arts and crafts that everyone will love. Stock up on magnets because these crafts are guaranteed to make it on the refrigerator door!

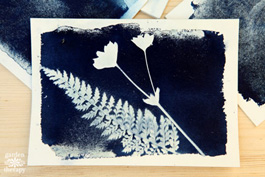
Sun Print Cards
What you'll need:
• Sun Art paper kit (available on Amazon)
• outdoor objects, i.e., flowers and leaves
• tub of water
• lemon juice (optional)
• towel
• book for pressing (optional)
Directions
1. Let your child find interesting looking natural objects (leaves and flowers) in your backyard or local park.
2. Go into the shade and pull out a couple sheets of sun art paper. You can purchase these from your local crafts store or amazon.
3. Arrange the leaves, flowers and whatever else your children find on the paper.
4. Next, put a clear acrylic sheet (comes with the paper) over the objects before going back into the sun. This holds down your natural objects, so they don't blow away in the wind or move around during the exposure time.
5. Leave the paper in the sun for three to five minutes, until it turns a very light blue.
6. Put the papers into a tub of water for one minute.
7. For a higher contrast and deeper shade of blue, add a few drops of lemon juice to the water.
8. After the prints have soaked for a minute, let them dry on a towel.
9. Once completely dry, you can press them in a book to make sure they stay flat.
10. After a day, your sun prints will be ready to hang!
Courtesy of: http://www.pbs.org/parents/crafts-for-kids/sun-prints/
Photo courtesy of: https://gardentherapy.ca/sun-print-cards/

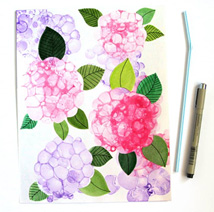
Bubble Paint Flowers
What you'll need:
• Dish soap
• Non toxic acrylic paint paint
• Shallow bowl
• Straw
• Card stock
• Paint brush
Directions
1. Start by creating the mix. 1 part acrylic paint, 1 part dish soap, and 2 parts water.
2. Blow into the mixture with your straw to create bubbles.
3. When you get a clump of bubbles take a piece of card stock paper and press it onto the bubbles. You can repeat a couple of times to get the desired shapes and colors.
4. Once your blossoms have taken shape, paint some watercolor leaves in various shades of green, cut them out and glue them around the blossoms to complete your project!
Courtesy of: https://www.apieceofrainbow.com/bubble-paint-flower-hydrangeas/

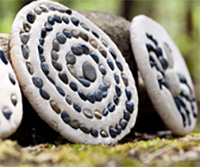
Pebble Plaque
What you'll need:
• 3 cups flour
• 1 cup salt
• 1 1/4 cups water (plus up to an additional 1/4 cup, as needed)
Directions
1. This project starts with a trip outside to collect a basket of small, beautiful stones for an all natural mosaic.
2. Beat the ingredients together until a ball forms. If the mixture is still crumbly, add more water.
3. Knead the dough until its smooth and divide the dough into three balls.
4. Place each ball on a piece of foil and flatten it into a disk.
5. After washing and drying the pebbles, press them into the dough to create a design.
6. Heat the oven to 275 degrees. Transfer the foil and dough onto a baking sheet.
7. Bake the plaques for two hours, then let them cool completely.
8. Once the plaque has cooled, check to see if any pebbles are loose; if so, remove them, add a drop of glue to keep them in place!
Courtesy of: https://www.parents.com/fun/activities/outdoor/sticks-stones-outdoor-craft-ideas-for-kids/
